
Search Templates & Merge Tags
Introduction
Gravity Search provides flexible options for displaying Target Form entry data in search results, map info windows,
and individual entry displays.
You can build output using configurable Structured Fields or write Custom HTML with supported template tags. These tags can insert Target Form values, entry information, and, when the current output provides them, distance data and Details links.
The available tags depend on the output context. Results and map info windows can represent a specific entry-location result. Details Display is entry-level, and Page Content uses Gravity Forms merge-tag processing rather than the Custom HTML tag parser described below.
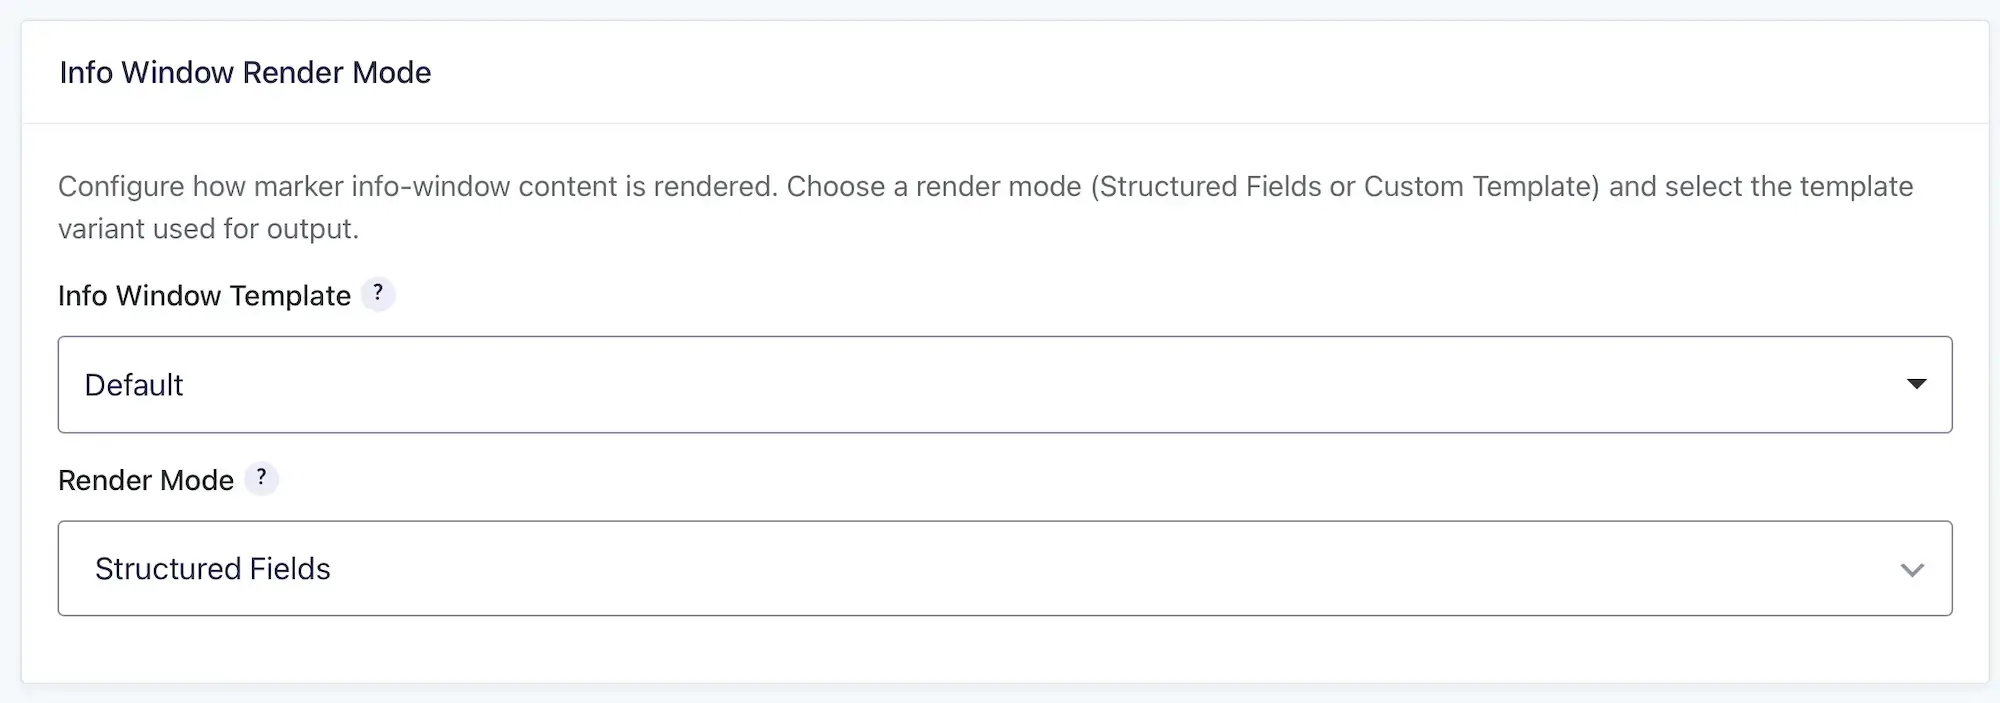
Output Modes
Structured Fields
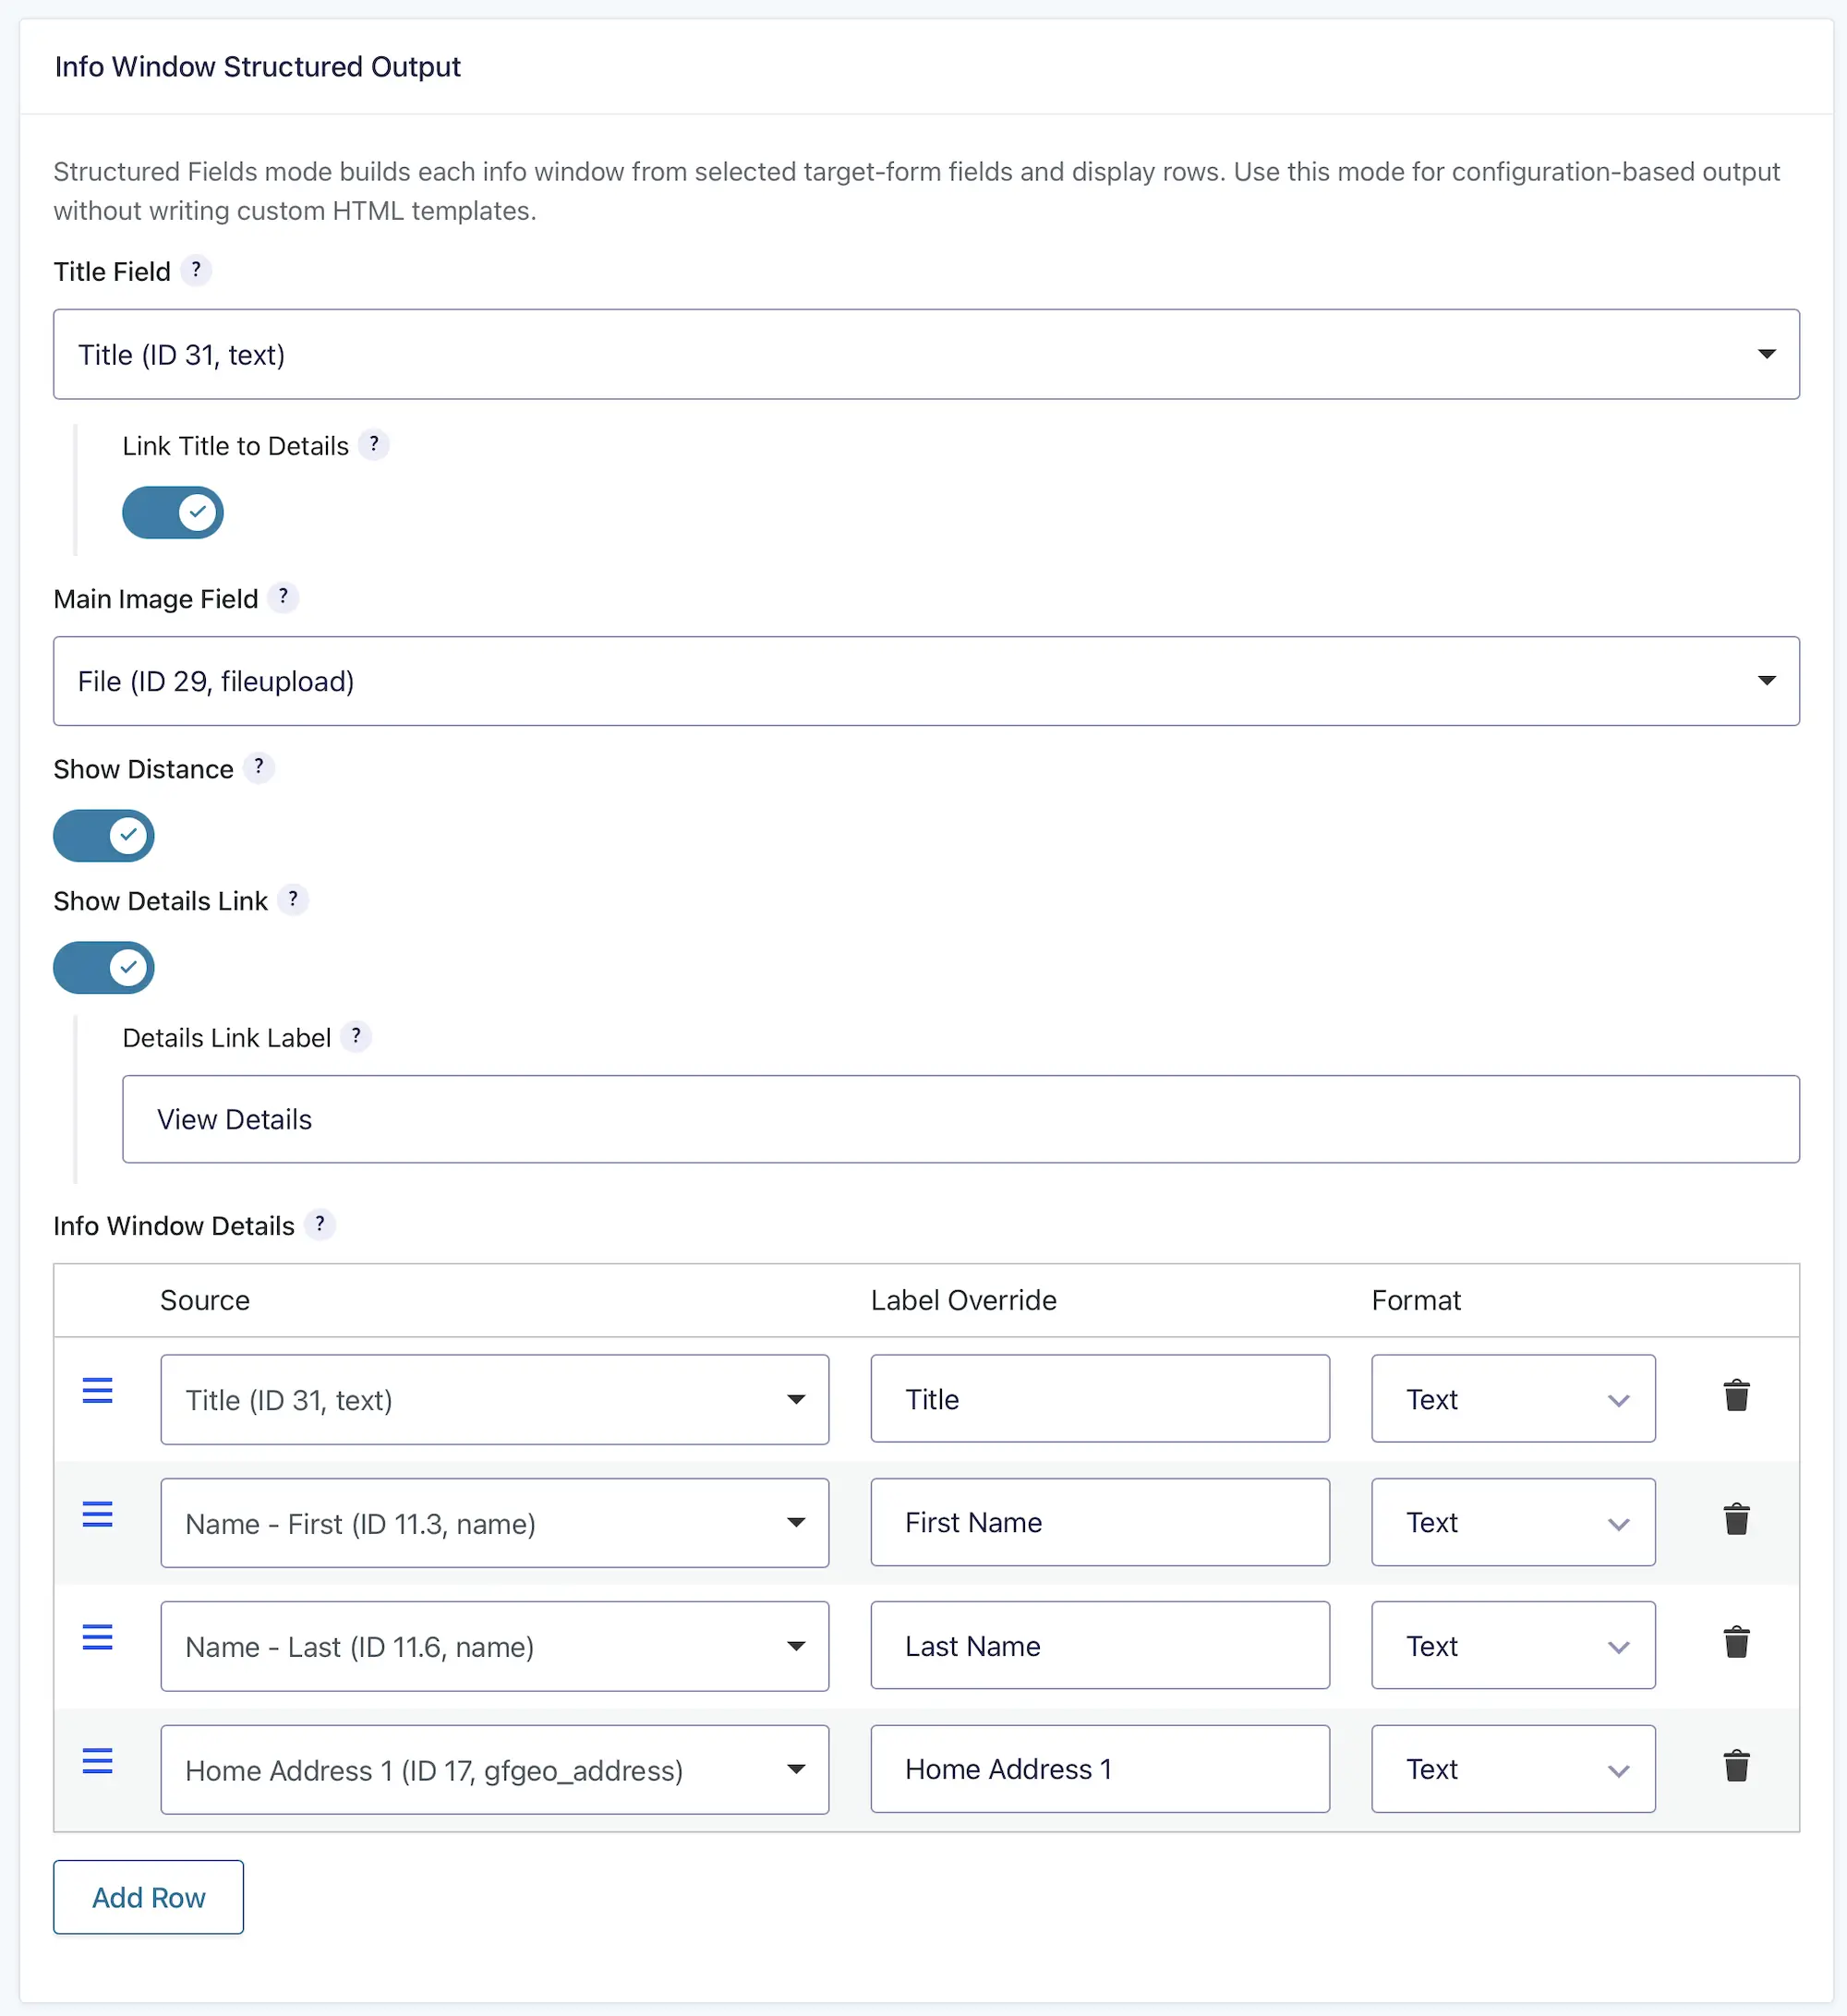
Structured Fields mode builds output from settings rather than custom markup. The available controls depend on the output area:
- Results: Visual Template, Title Field, title linking, Main Image Field, distance, Details link, and configurable result rows.
- Map Info Windows: Visual Template, Title Field, title linking, Main Image Field, distance, Details link, and configurable info-window rows.
- Details Display: Title Field, Main Image Field, and configurable Details Fields rows. Details Display does not offer distance or Details-link row sources.
The general workflow is the same: select the fields or supported entry values to display, optionally override row labels, choose a Text, Link, Link (New Tab), or Image format, and arrange the rows.
Use Structured Fields when you want consistent output without maintaining custom markup.
Custom HTML
Select Custom HTML as the Output Mode when you need to create your own markup.
Depending on the section you are configuring, the HTML editor is labeled:
- Result Item HTML under Results settings.
- Table Header HTML when using a table results template.
- Info Window HTML under Map settings.
- Details HTML under Details Display settings.
Use the tag selector beside the editor when available to insert Target Form fields without entering field IDs manually. The selector inserts tags appropriate to the current Target Form; the reference below documents the additional built-in forms and modifiers.

Supported Custom Template Tags
The tags in this section are parsed in Gravity Search Custom HTML settings. Field and entry tags use the current Target Form entry. Location, distance, and Details-link output also depends on the context described with each group.
Unknown brace tags are left unchanged so a typo remains visible during testing. Supported tags whose data is unavailable generally render an empty value.
Where Output Modes Are Used
- Results: Choose Structured Fields or Custom HTML for each entry-location result item.
- Map Info Windows: Choose Structured Fields or Custom HTML for each result marker’s info-window content.
- Details Display: Choose Structured Fields, Custom HTML, or Page Content for the parent entry.
For Details Display, Structured Fields and Custom HTML appear where [gfgeo_search_entry] is placed on the selected Details Page. Use the Copy shortcode and Edit Page helpers on the Details Display tab. A generated Details URL supplies the Search and Entry IDs automatically.
Page Content works differently. It processes the selected WordPress page content using Gravity Forms merge tags such as {Business Name:4}. Do not add [gfgeo_search_entry] in Page Content mode. Gravity Search-specific Custom HTML tags such as {field:4}, {distance}, and {details_link} are not the Page Content tag format.
Custom HTML Examples
Basic Result Item
<div class="directory-item">
	<h3>{field:1|details_link}</h3>
	<p>{field:3}</p>
	<p>{distance_with_units}</p>
</div>
Result Item With an Image
<div class="directory-card">
	{field:5|image}
	<h3>{field:1|details_link}</h3>
	<p>{field:2}</p>
	{details_link|View Full Details}
</div>
Table Result Row
<tr>
	<td>{field:1|details_link}</td>
	<td>{field:3}</td>
	<td>{distance_with_units}</td>
	<td>{date_created|format:Y-m-d}</td>
</tr>
When using a table results template, enter the column headings separately in the Table Header HTML
setting.
Details Custom HTML
<article class="member-details">
	<h2>{Name:1}</h2>
	<p>Entry {entry_id}</p>
	<p>{field:3}</p>
</article>
Use field and entry tags for Details Custom HTML. Do not depend on distance or Details-link tags there because the Details view is entry-level and already represents the requested entry.
Template Context & Fallbacks
- A matching entry can produce multiple Results items or markers when it has multiple qualifying locations. Each item keeps its own result-location identity and available distance data.
- Details Display renders the parent entry. It does not retain the specific result-location or marker context selected by the visitor.
- Distance output requires calculated distance data. Without a usable proximity origin, distance tags return no value.
- Details-link output requires a published Details Page and an eligible generated Details URL.
- Unknown Custom HTML tags remain visible instead of being silently removed, which helps identify typing or field-ID mistakes.
Best Practices
- Start with Structured Fields unless your layout requires custom markup.
- Use the merge-tag selector when available to avoid entering incorrect field IDs.
- Keep display markup in the output settings and configure search behavior elsewhere in Search Settings.
- Test Custom HTML with entries containing empty fields and missing images.
- Test distance tags both with and without an active proximity search.
- Test an entry with multiple qualifying locations so Results and marker templates can be checked separately from the entry-level Details view.
- Configure and test the Details Page under Search Setup → Details Routing before adding details links to results or info windows.
- Use
[gfgeo_search_entry]only for Structured Fields or Custom HTML Details output; use Gravity Forms merge tags directly in Page Content mode. - Use valid table markup when creating custom table headers and result rows.