
In this guide, you’ll learn:
- How frontend entry search differs from the Gravity Forms Entries screen.
- What directories, portals, and searchable displays you can build.
- How Gravity Search connects a Search to an existing Target Form.
- How optional filters, results, maps, and details pages work together.
- When a configured solution is easier to maintain than custom development.
If you have been using Gravity Forms for a while, collecting entries may no longer be the challenge. The challenge is helping visitors, customers, members, or employees find and use those entries on the frontend of your site.
Your forms might hold business listings, member registrations, customer records, properties, events, service requests, or internal resources. The Gravity Forms Entries screen is excellent for administrators, but it is not designed to become a public directory, customer portal, or searchable database.
Gravity Search adds a configurable frontend search and display layer to the Gravity Forms data you already have. You do not need to move entries into custom post types or maintain a second database.
What can you build with searchable Gravity Forms entries?
The same basic system can support many different projects:
- Business and member directories searched by name, category, services, interests, or location.
- Customer portals that show logged-in users the entries they are allowed to access.
- Store and provider locators with optional maps, radius filtering, and distance sorting.
- Property, event, and resource listings filtered by keywords, dates, choices, and numbers.
- Employee and internal databases that make records searchable without dashboard access.
See the Business Directory, Member Directory, Customer Portal, and Store Locator examples for more ideas.
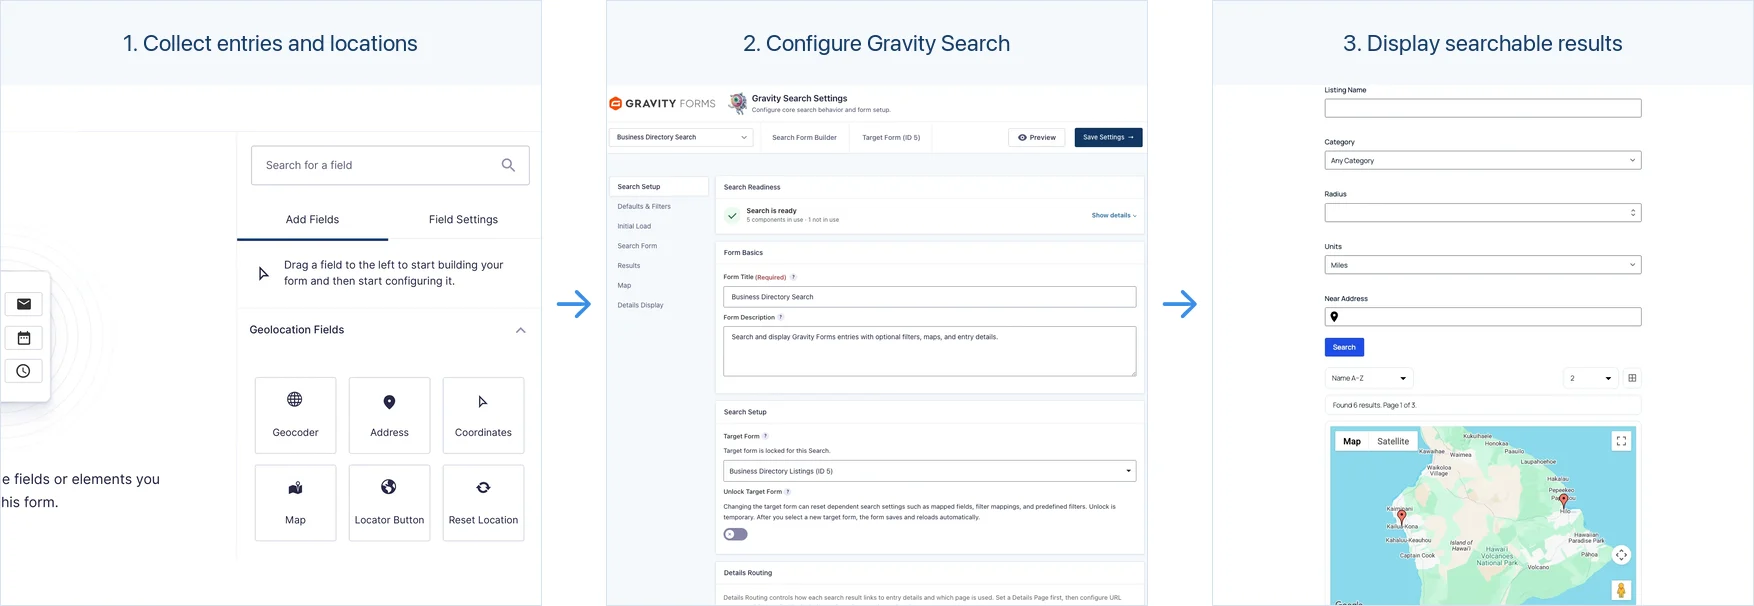
How Gravity Search works
A Gravity Search setup has two essential parts:
- Target Form: the existing Gravity Form whose entries will be queried.
- Output: the list, table, map, or other results visitors will see.
Visitor-facing search controls are optional. You can add a Search Form when users need to enter keywords or select filters, or enable Initial Load and predefined filters to display selected entries automatically.
Maps, proximity search, and individual entry details pages are optional as well. A valid Search can simply display a list of entries without collecting visitor input and without linking anywhere else.
Step 1: Create a Search and select its Target Form
After installing Gravity Search, choose Forms → New Search. Select the Target Form that contains the entries you want to display, then save Search Setup.
The Search is a special Gravity Forms configuration object. It does not collect new entries. The Target Form remains the source of the data.
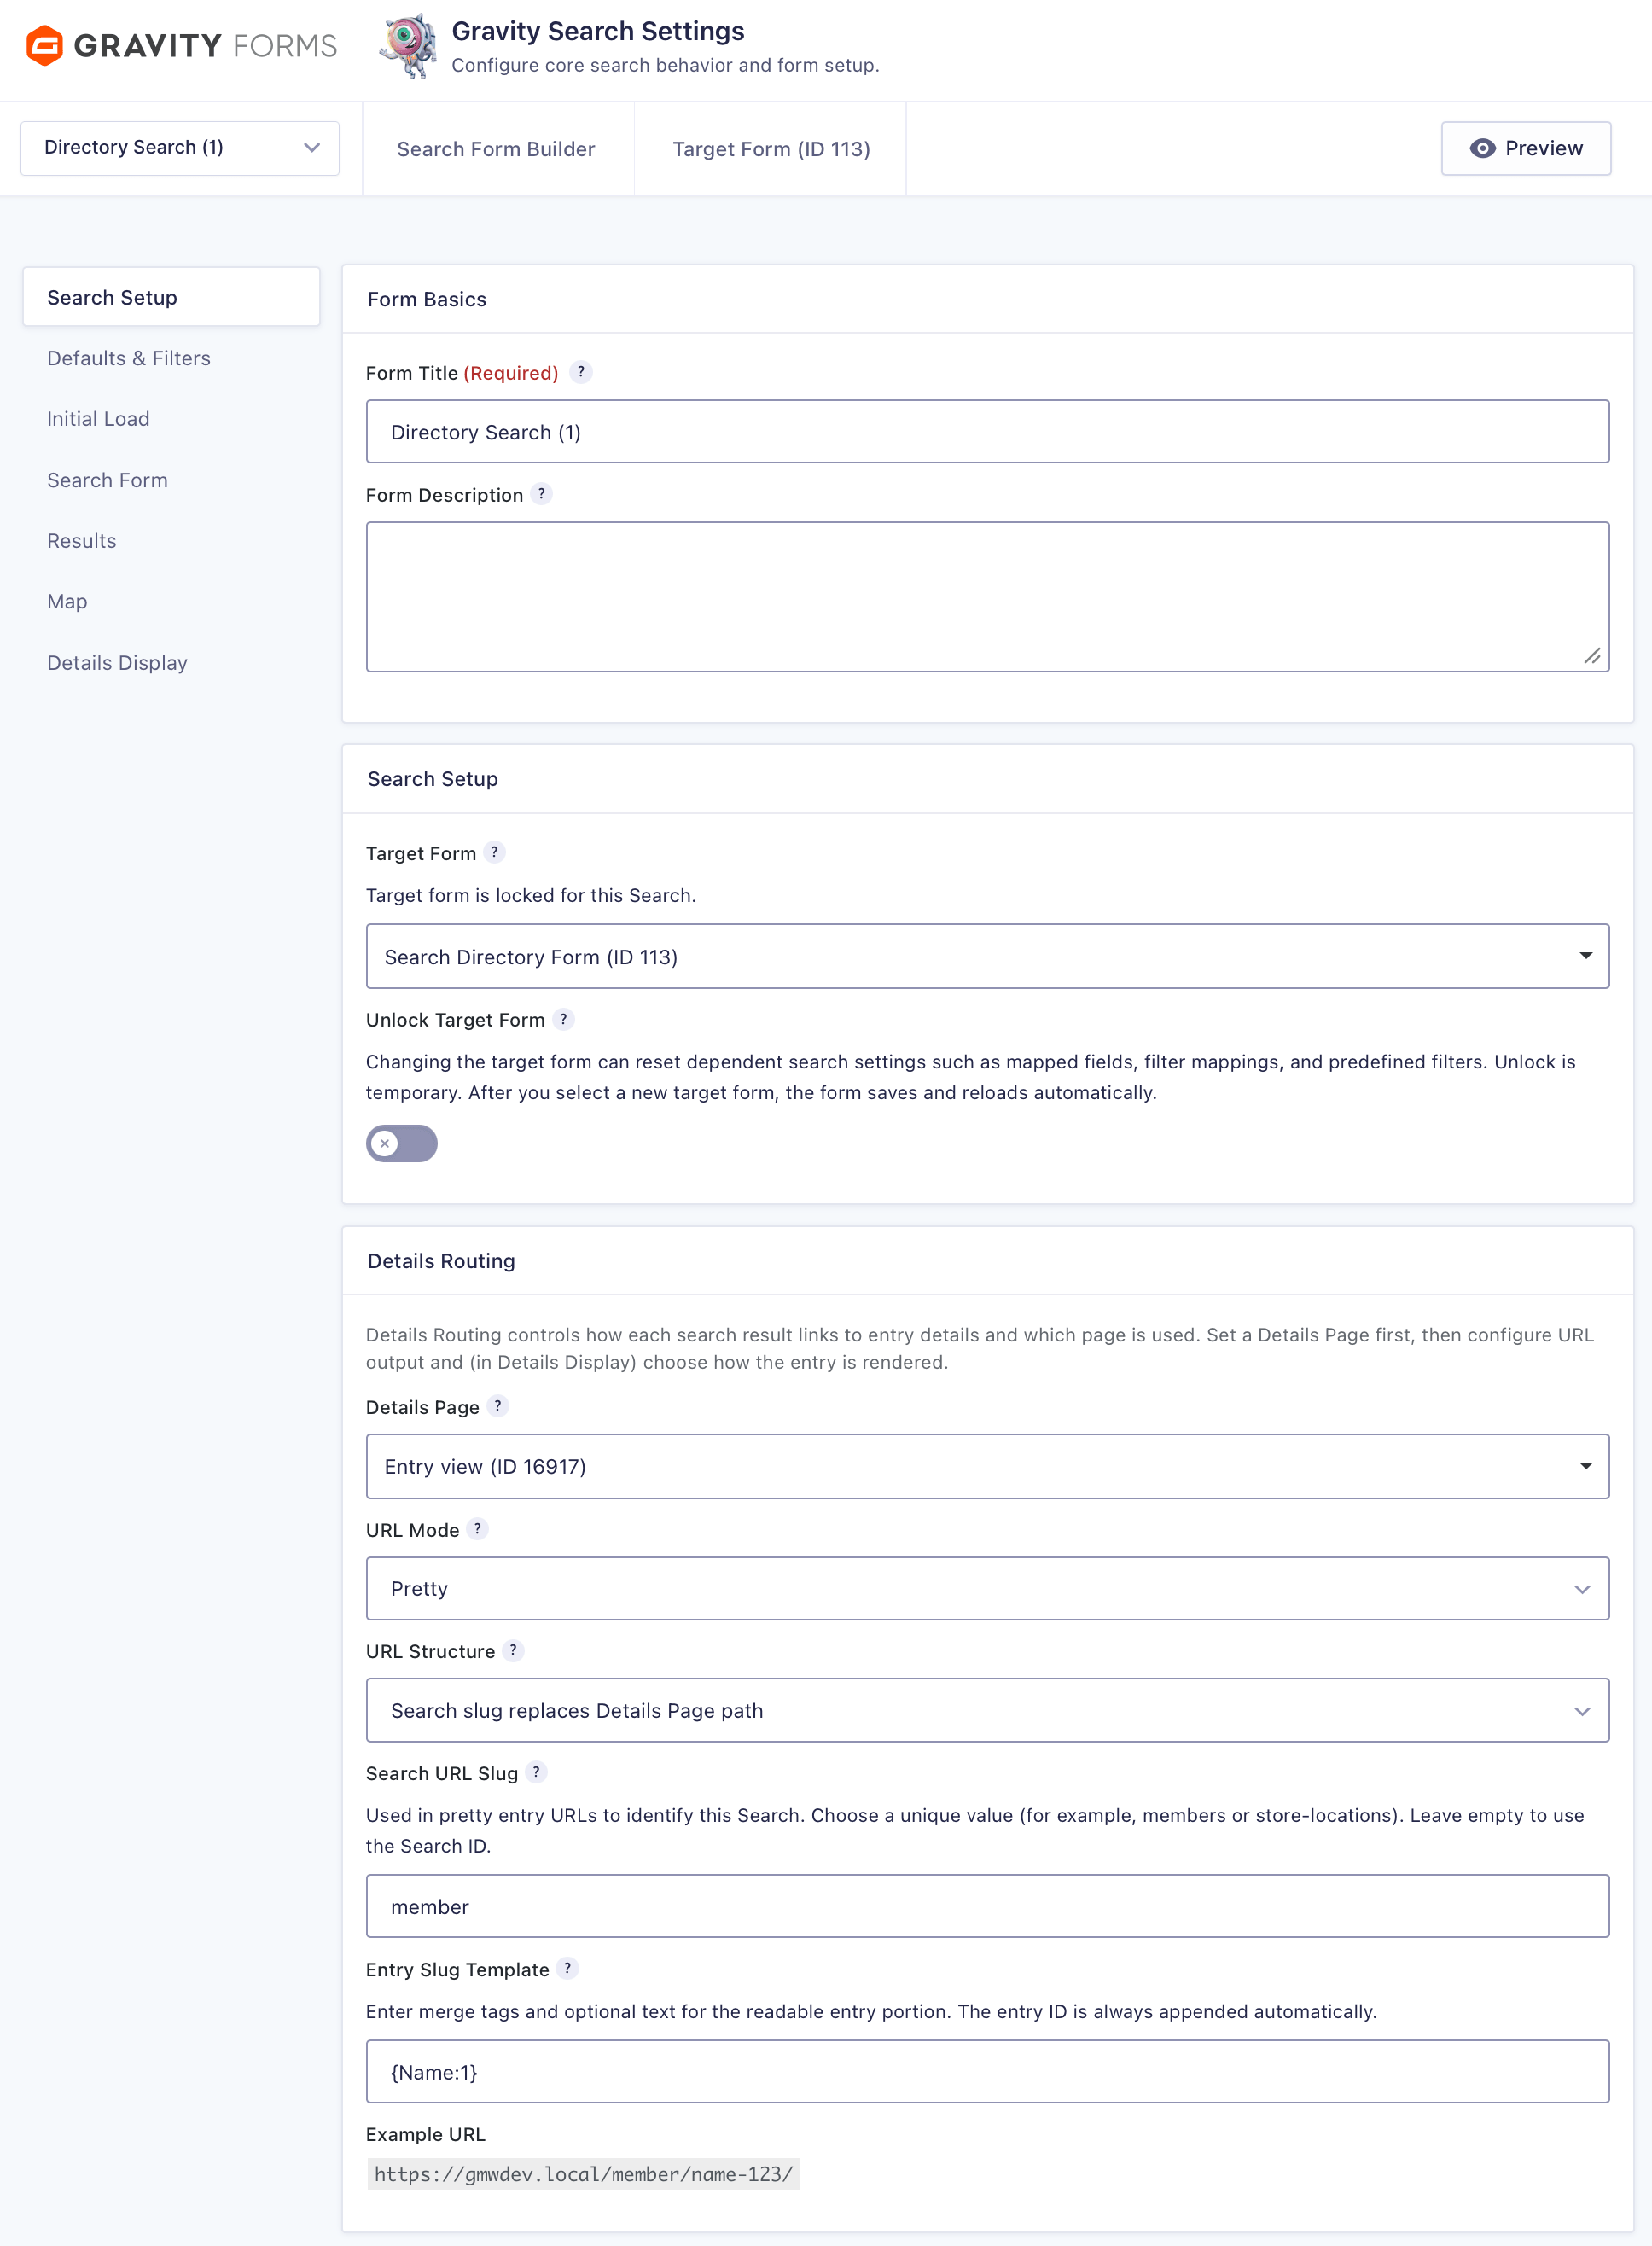
See Creating Your First Search for the complete setup sequence.
Step 2: Decide whether visitors need search controls
If visitors should enter keywords or choose filters, open Search Form Builder and add the fields they need. Because this uses the standard Gravity Forms builder, familiar text, choice, date, number, and supported custom fields are available.
If the page should simply display a predefined directory or list, you can skip visitor controls. Enable Initial Load, add any administrator-defined filters, and let the results load automatically.
Step 3: Map visitor fields to the stored entry data
When a visitor-facing form is enabled, Filter Mappings connect each Search field to a Target Form field or supported entry information. The source and target field types do not always need to be identical.
For example, a business directory might use:
- A text field that searches the business name or description.
- A category choice that filters an existing select or checkbox field.
- Minimum and maximum number fields for a numeric range.
- A normal Address field component filter for city, state, postal code, or other stored address values.
- Separate Proximity Search controls when visitors need an address-and-radius search.

Read the Search Field Mapping guide for field, entry metadata, creator, and predefined filtering options.
Step 4: Configure the results
Choose which Target Form fields appear in each result and select a list, grid, or table layout. You can also configure sorting, pagination or Load More behavior, and results-per-page choices.
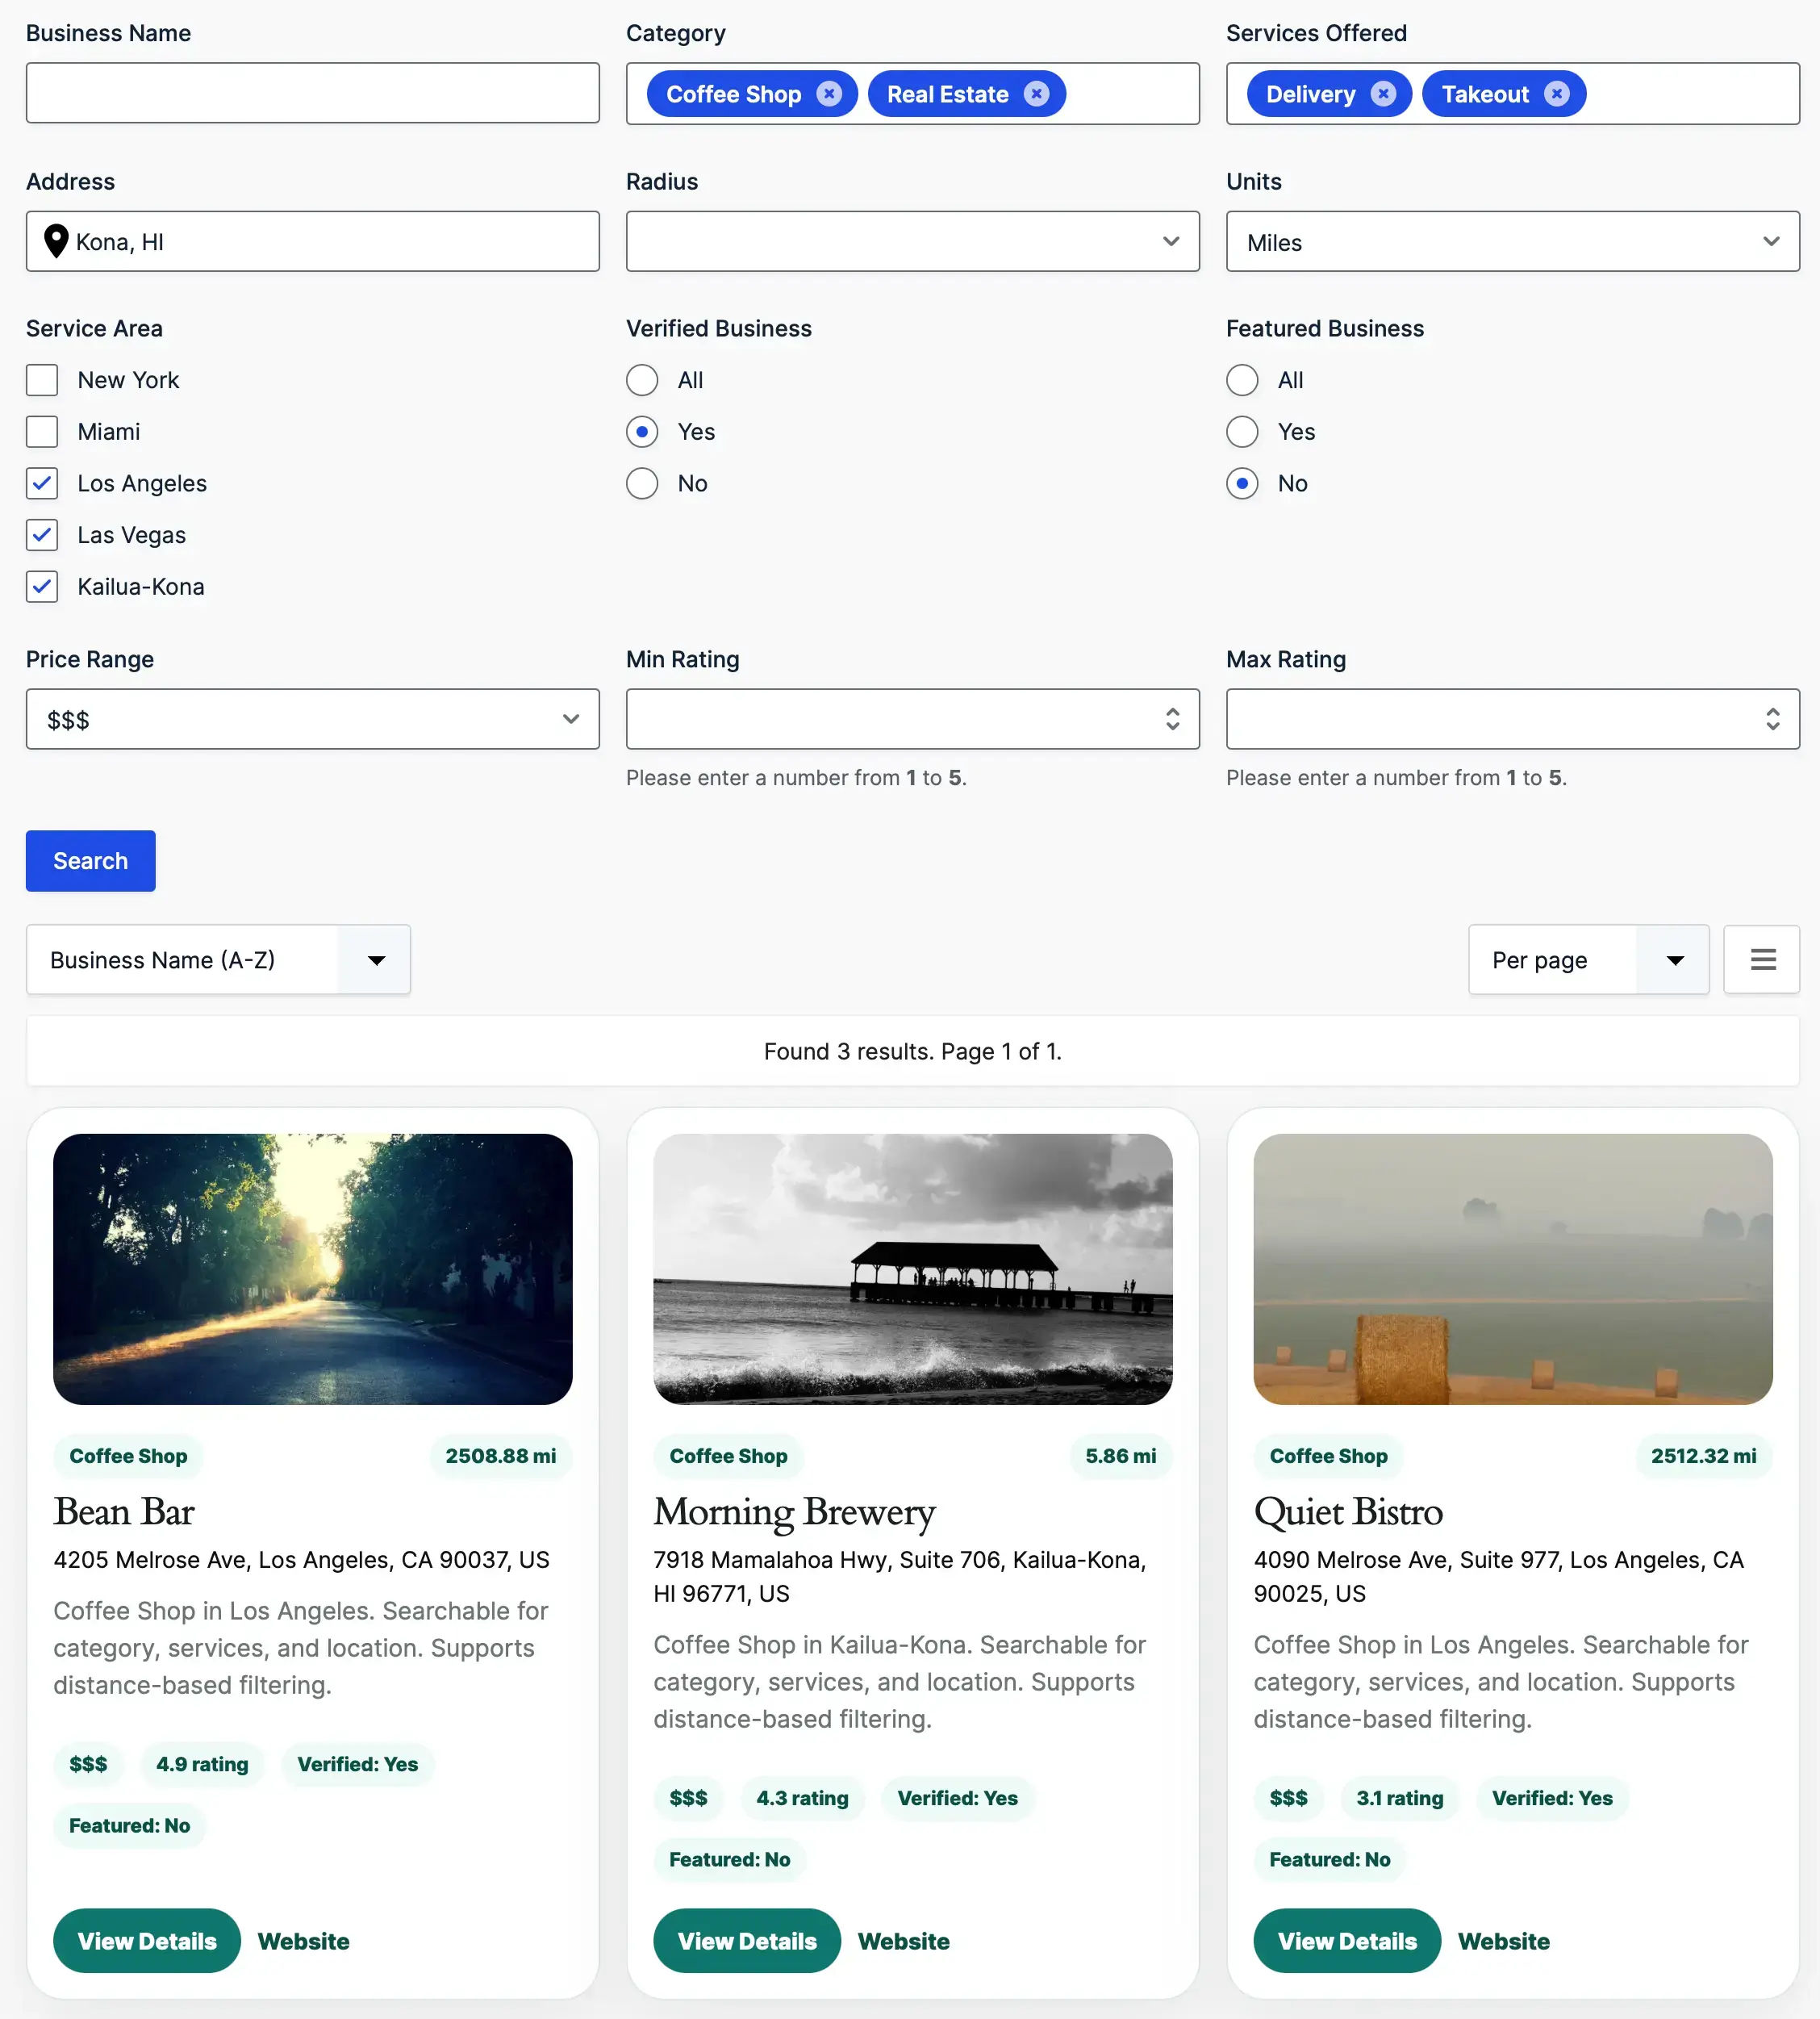
See Search Results Settings for the current
layout and output controls.
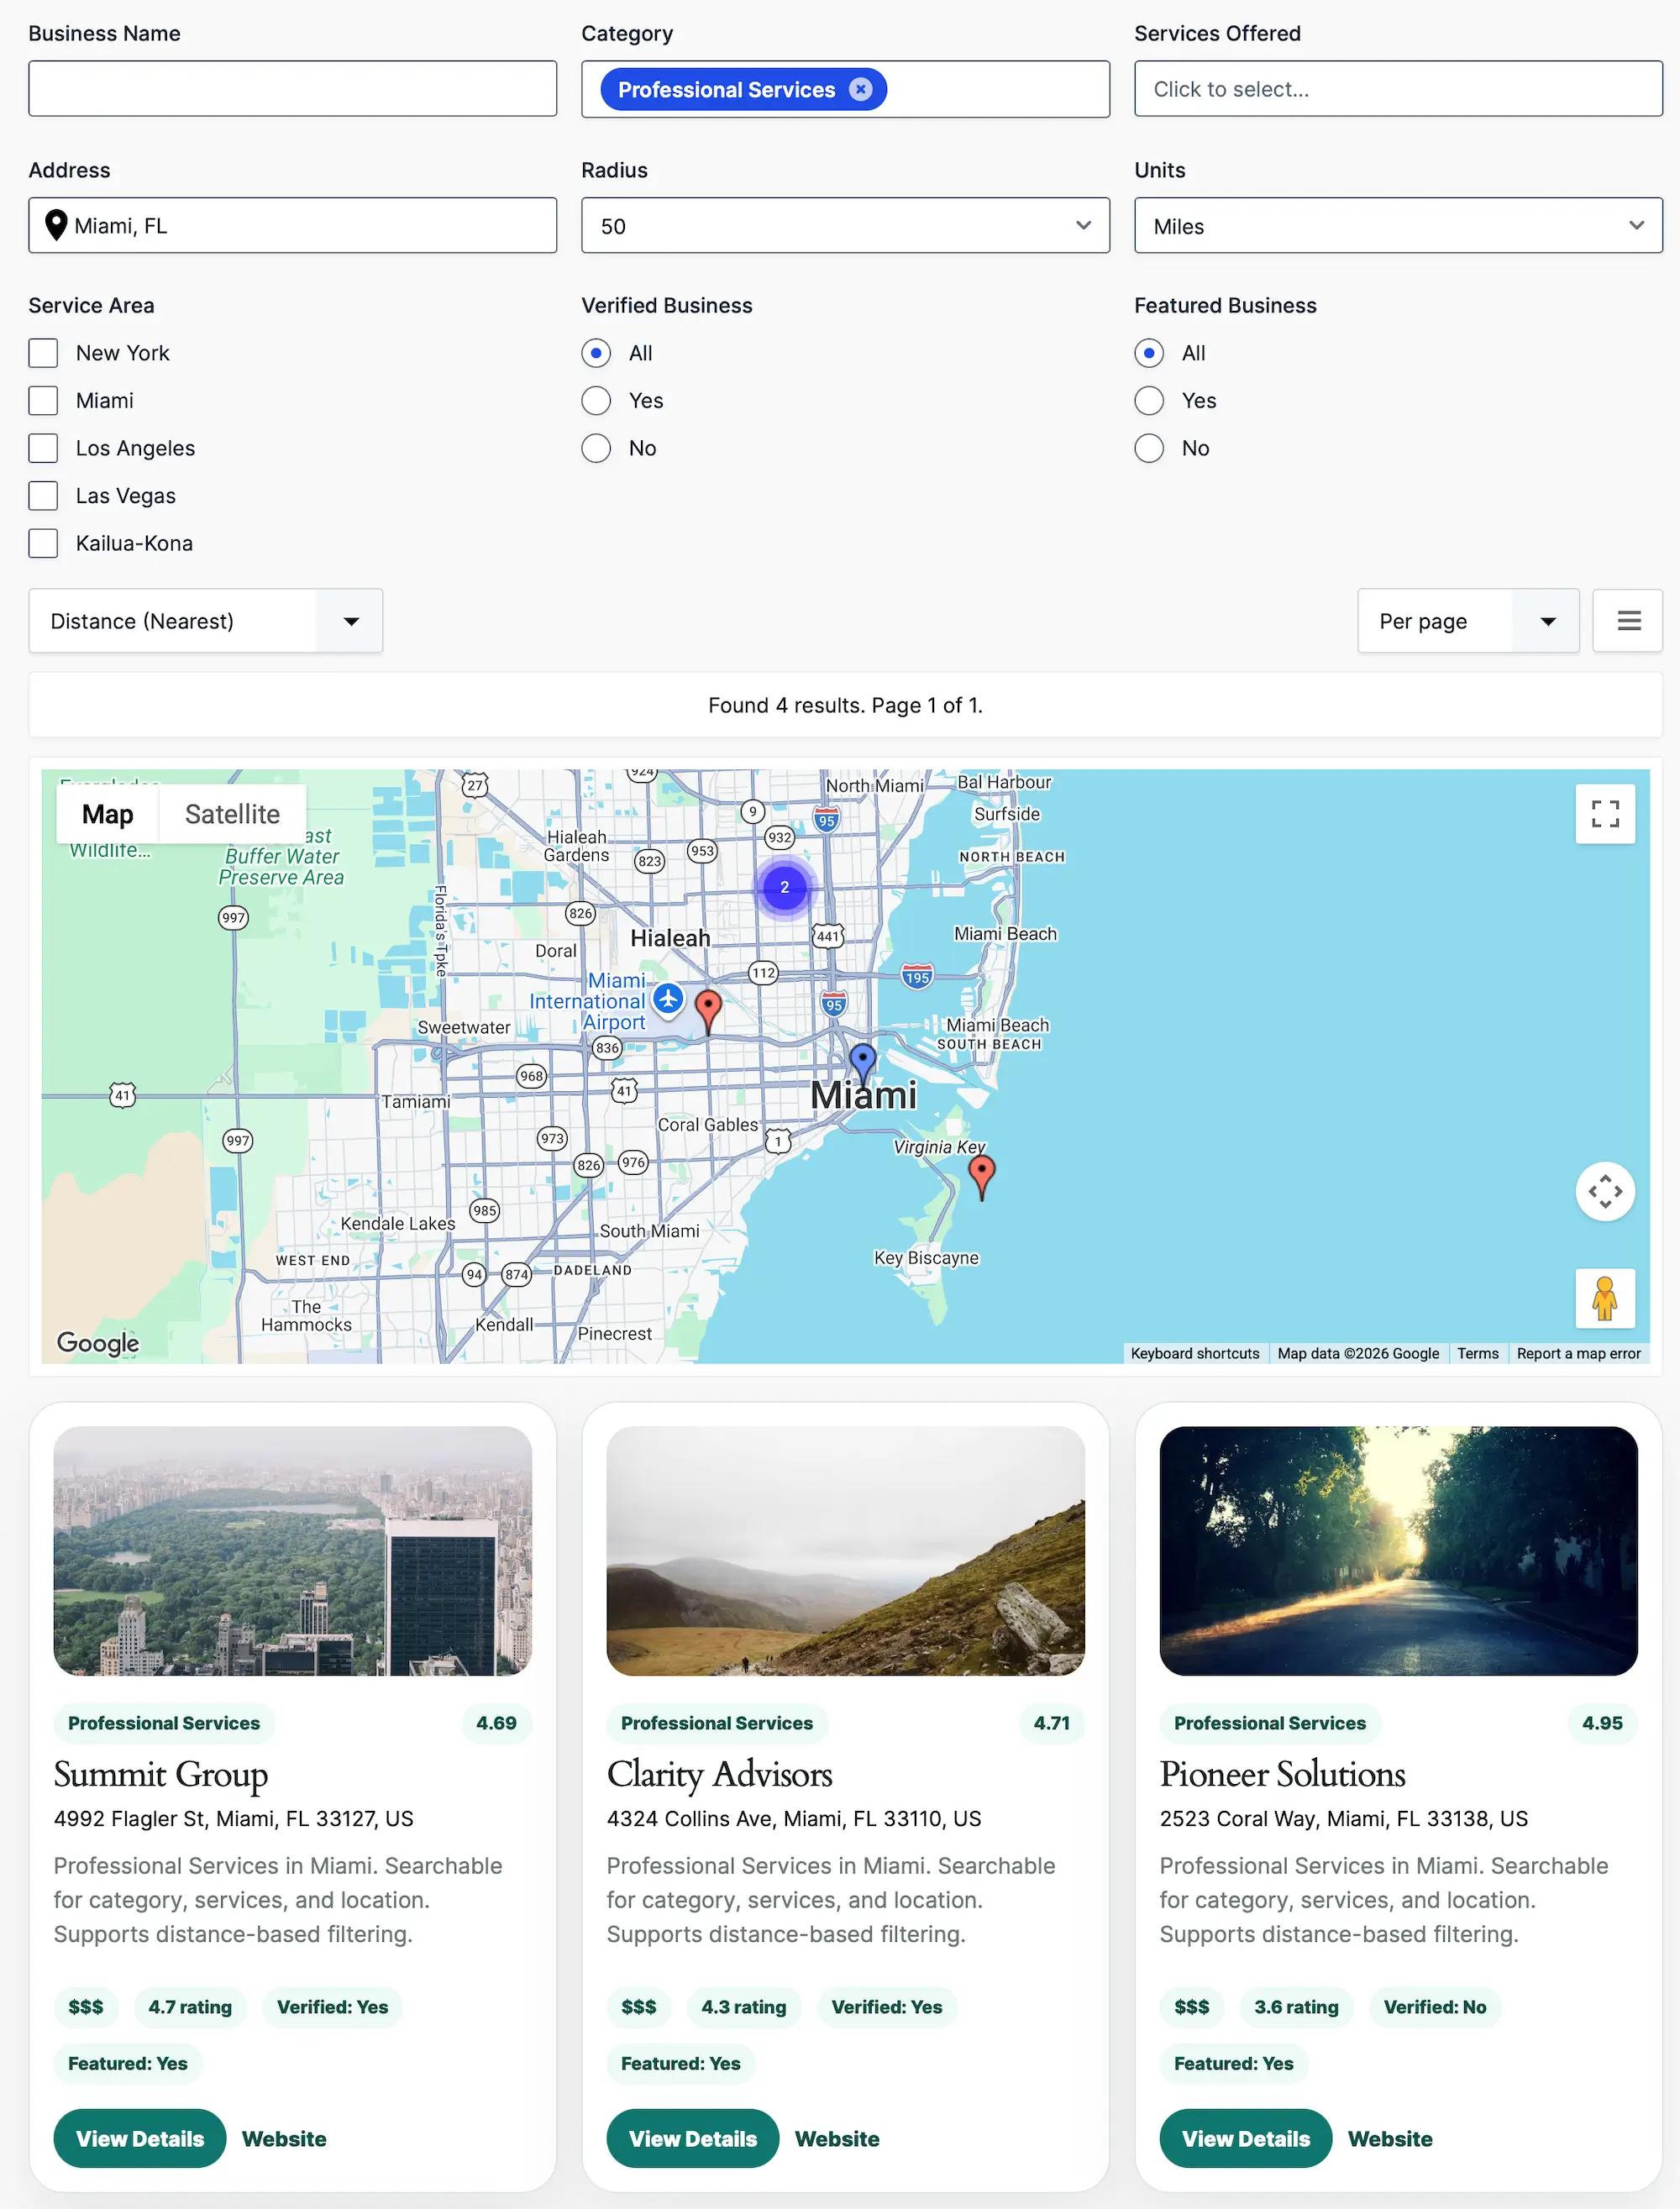
Step 5: Add location search only when the project needs it
Gravity Search works without location data. When the Target Form has compatible synchronized or imported locations, you can select those fields as location sources and add:
- Address and radius controls for proximity search.
- Distance-based sorting and distance values in results.
- An interactive results map with markers and information windows.
The ordinary Gravity Forms Address field can still be mapped as a text or component-based filter. It does not automatically become the proximity control.
The standalone Gravity Search package searches existing entry and location data. It does not include the Gravity Geolocation fields used to collect new locations. Choose All Access when you need both the Geolocation Toolkit and Gravity Search.
Step 6: Add an entry Details Page only when useful
A Details Page lets visitors open an individual entry from the results. It can use structured fields, custom HTML, or page content with Gravity Forms merge tags.
This page is optional. If a Search only needs to display cards, a table, or a map, leave Details Page unselected and keep details links disabled.
Example: a searchable business directory
Imagine a Target Form that stores a business name, category, description, address, phone number, website, and featured image. A Search could display those entries with:
- A keyword search for the name and description.
- A category or services filter.
- Optional address and radius controls.
- Card-based results with selected contact details.
- An optional map showing the matching locations.
- Optional links to individual business profiles.
Why use Gravity Search instead of custom code?
| Approach | Best for | Considerations |
|---|---|---|
| Gravity Forms Entries screen | Administrators managing submissions. | Not designed as a visitor-facing directory or portal. |
| Custom development | Projects requiring completely bespoke query and display behavior. | Requires development, security review, templates, pagination, URL handling, and ongoing maintenance. |
| Exporting entries | Reports, spreadsheets, and offline analysis. | Produces a separate snapshot rather than a live search experience. |
| Gravity Search | Configurable frontend search, directories, portals, lists, tables, maps, and optional details pages. | Available as a standalone product or together with the Geolocation Toolkit through All Access. |
Frequently asked questions
Can visitors search Gravity Forms entries without dashboard access?
Yes. A Search can appear on a public page, or you can restrict the page and results for logged-in portal or
internal-directory workflows.
Does a Search need visitor-facing fields?
No. Search Form Builder fields are optional. Enable Initial Load to show results automatically, with or without
predefined administrator filters.
Are maps and proximity search required?
No. Gravity Search supports ordinary Gravity Forms entry search and display. Add location sources, maps, and proximity
controls only when the project needs them.
Is an entry Details Page required?
No. Results can remain a self-contained list, grid, table, or map. Select a Details Page only when visitors should open
individual entries.
Do I need to move entries into custom post types?
No. The Target Form remains the source of truth, and Gravity Search queries its existing entries directly.
Do I need the Geolocation Toolkit?
No. Gravity Search is available as a standalone product. Choose All Access when you also need the complete Geolocation
Toolkit for location fields, routing, validation, nearby-location features, drawing tools, and maps.
Start searching and displaying your entries
Gravity Forms makes structured data collection easy. Gravity Search makes that data easier to find, browse, and use on
the frontend.
- Start with the Gravity Search overview
- follow Creating Your First Search
- visit the Gravity Search solution page for demos
and purchasing options.