
A flat delivery charge is simple, but it rarely reflects the real cost of traveling to different destinations. If your business charges according to mileage, service radius, or travel time, you can calculate the fee directly inside Gravity Forms instead of reviewing every submission manually.
Gravity Directions provides the location and travel fields needed to calculate the route. Dynamic Location Data includes dedicated calculation outputs for the distance in meters and the duration in seconds. It can populate either value into a standard Gravity Forms field for use in product calculations, conditional logic, notifications, confirmations, and connected workflows.
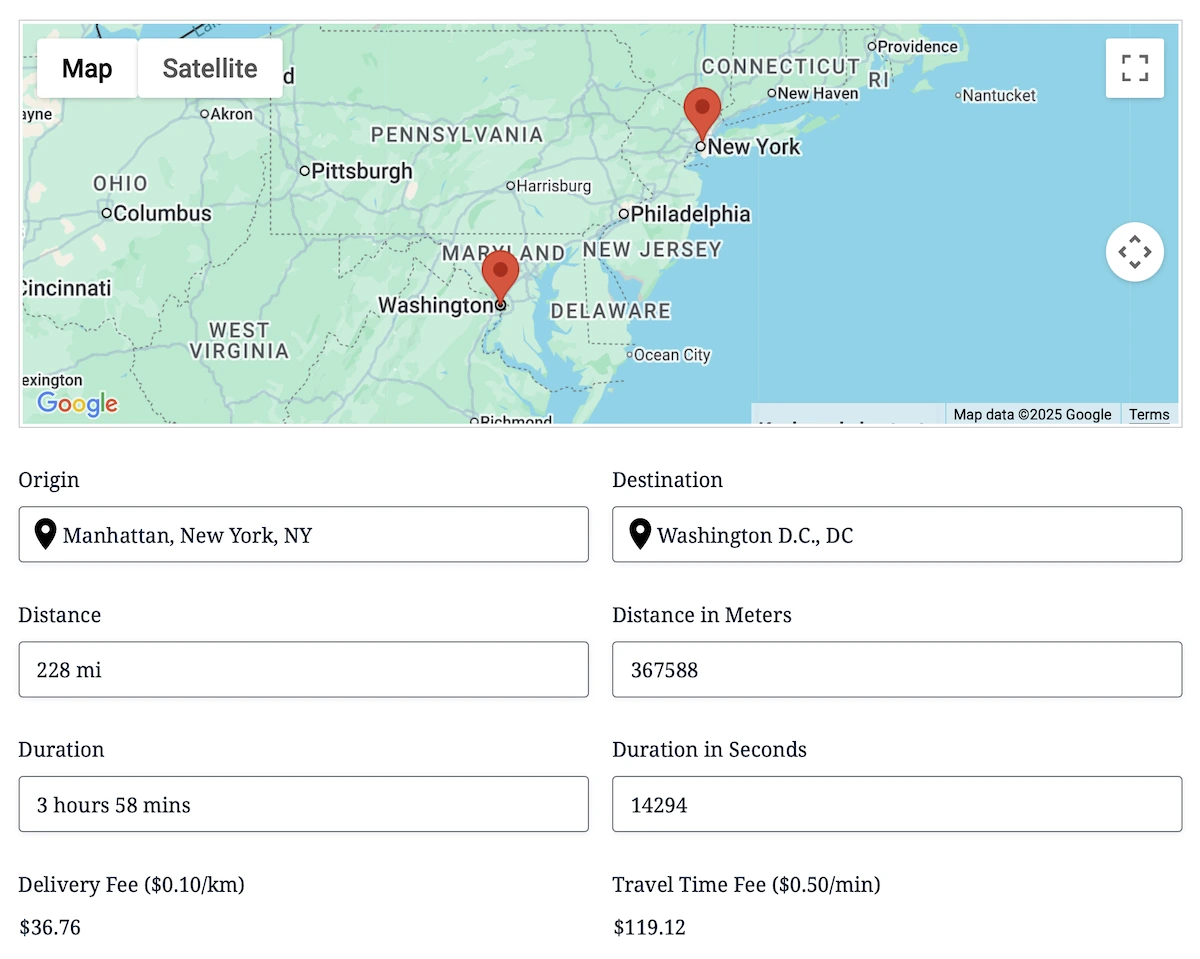
What the Delivery Calculator Does
A typical distance or duration-based delivery form follows this sequence:
- The form supplies the route origin, either from a location entered by the visitor or from an origin configured by the administrator.
- The visitor enters or selects the destination using an Address, Map, Coordinates, or another compatible location field.
- The Distance & Duration Field calculates the route distance and estimated travel time.
- Dynamic Location Data populates a Number Field with the distance in meters or the duration in seconds.
- A Gravity Forms calculation applies your pricing formula.
- The form displays the fee and saves the addresses, distance, duration, and price with the entry.
The calculation logic remains in Gravity Forms. Gravity Directions supplies the travel value used by that calculation.
What You Need
- WordPress and Gravity Forms
- Gravity Directions, Gravity Geolocation Toolkit, or All Access
- A Google Maps API key configured for the APIs used by the form
- An origin location, such as your store, kitchen, warehouse, or office, or a second location entered by the visitor
- Your delivery-pricing formula
Before building the form, decide whether the fee should use route distance, estimated duration, or straight-line distance. Route distance is useful for mileage-based pricing, while duration can better represent technician time, congestion, and other time-sensitive services. Straight-line distance can be useful for a simple service-radius rule, but it does not account for roads, bridges, or route conditions.
Step 1: Add the Route Locations
Add the location fields required by your route. The origin and destination can both be entered by the visitor. For example, a quote form could present two Address Fields so the visitor can enter a pickup location and a drop-off location.
A common delivery form instead uses a fixed business origin and asks the visitor for only the destination. In that setup, the origin does not need a visible Address Field. Add a Geocoder Field for the origin and configure its default coordinates to the business location. The administrator-defined geocoder supplies the route origin behind the scenes, so the visitor sees only the field or fields needed to choose the destination.
The destination can come from an Address Field, Map Field, Coordinates Field, or another compatible location source. When using an Address Field, connect it to its Geocoder Field and enable autocomplete so the visitor can select a recognized location rather than entering an ambiguous free-form value. The geocoders provide the coordinates used by the travel calculation.
If customers sometimes request pickup instead of delivery, add a delivery-method choice and use Gravity Forms conditional logic to show the destination and delivery price only when delivery is selected.
Step 2: Configure Distance & Duration
Add the Distance & Duration Field and select the origin and destination fields it should use. Configure the calculation mode, unit, travel settings, and trigger behavior for your workflow.
The field can display the resulting distance and estimated duration to the customer. It also makes dedicated calculation values available to Dynamic Location Data: distance in meters and duration in seconds. These outputs let the result participate in standard Gravity Forms calculations independently of the units or formatted labels displayed to the visitor.
Test several nearby and distant addresses at this stage. Confirm that the route is calculated in the expected direction, the displayed unit is correct, and changing an address refreshes the result.
For the complete field settings, see the Distance & Duration Field documentation.
Step 3: Put the Distance in Meters or Duration in Seconds in a Number Field
Add a compatible Gravity Forms Number Field and configure Dynamic Location Data to populate it from the Distance & Duration Field. Select the dedicated distance in meters or duration in seconds option that matches your pricing model.
This separation is important. A customer-friendly result may say something like “12.4 miles” or “28 minutes,” while the calculation field receives a consistent base value in meters or seconds. Your Gravity Forms formula can then convert that value into miles, kilometers, minutes, or hours as needed.
You can keep the Number Field visible when customers should see the value used for pricing, or hide it when the travel value is only an internal calculation input. Give the field an administrative label such as Delivery Distance or Estimated Travel Time so its purpose remains clear in entries and exports.
See Dynamic Geolocation Field documentation for the available source and output options.
Step 4: Build the Delivery-Fee Formula
Once the distance in meters or duration in seconds is available, use Gravity Forms’ normal calculation tools to convert the value when necessary and create the price.
A simple formula might be:
Delivery fee = base fee + ((distance in meters ÷ 1609.344) × price per mile)For example, a business could charge a base fee of $5 plus $1.50 per mile. A route value of 16,093.44 meters equals 10 miles and would produce:
$5 + ((16,093.44 ÷ 1609.344) × $1.50) = $20A time-based service could instead use:
Service fee = base fee + ((duration in seconds ÷ 60) × price per minute)You can place the formula in a calculated Product Field or another suitable calculation field, depending on whether the value should become part of a Gravity Forms order total.
More advanced pricing can use multiple rules:
- A minimum delivery charge
- One price for the first distance band and another price beyond it
- A surcharge for long trips
- Free delivery below an order threshold or within a local radius
- A maximum service distance
- A travel-time surcharge for appointments or field services
Use conditional logic and additional calculated fields to express these rules clearly. Keep the base-unit travel value separate from the final price so both remain available in the saved entry.
Step 5: Handle Addresses Outside the Delivery Area
A calculator should not merely produce a very large fee for every possible destination. Decide what happens when the route exceeds your service limit.
Depending on the workflow, you can:
- Display a message asking the customer to contact you for a quote
- Hide the checkout or delivery product
- Prevent the delivery option from being selected
- Send the request to a manual-review workflow
- Use a different fee structure beyond the normal service radius
If your service rules depend on geographic boundaries rather than mileage alone, Gravity Geolocation’s Drawing Tools and Shape Fields can also collect or represent zones and service areas. Distance and zone membership answer different questions, and some businesses will use both.
Step 6: Test the Complete Workflow
Test more than one convenient address. Include:
- An address very close to the origin
- An address near a pricing threshold
- An address outside the supported area
- An incomplete or ambiguous address
- An address that requires an unusual route
- A mobile-device submission
Check the displayed fee, the saved entry, notifications, confirmations, payment total, and any CRM or webhook data receiving the result. Also confirm that changing an address refreshes the distance in meters, the duration in seconds, and the final price.
Distance and Duration-Based Pricing Ideas
The same structure works for more than food delivery. It can support:
- Courier and local-delivery quotes
- Mobile repair and installation visits
- Cleaning, landscaping, and maintenance travel charges
- Moving and transportation estimates
- Equipment pickup and drop-off
- Home healthcare and field-service mileage
- Airport transfer and shuttle requests
- Event and catering delivery fees
Frequently Asked Questions
Can Gravity Forms calculate a price from driving distance?
Yes. Gravity Directions can calculate the travel distance, and Dynamic Location Data can populate its dedicated distance-in-meters output into a compatible Gravity Forms field. Gravity Forms can convert that value into the required unit and use it in its normal pricing and calculation fields.
Can I charge by travel time instead of mileage?
Yes. Populate the dedicated duration-in-seconds output into a compatible field, convert it to minutes or hours in the formula when needed, and use it as the calculation input. This is useful when technician or service time matters more than mileage alone.
Does this require custom code?
A standard distance-times-rate calculator can be configured through Gravity Forms and Gravity Directions without custom code. Very specialized tiering, external rate tables, or business rules may require additional Gravity Forms logic or custom development.
Can the customer see the route?
Yes. If the workflow needs route visualization, connect the appropriate field to a Map Field. For complete route maps and turn-by-turn output, use the Directions Field and Directions Panel included with Gravity Directions.
Which package includes these fields?
Distance & Duration, Directions, Directions Panel, and their required dynamic travel outputs are available in Gravity Directions, Gravity Geolocation Toolkit, and All Access.
Build Your Gravity Forms Delivery Calculator
Gravity Directions combines address input, distance and duration calculations, route maps, and turn-by-turn directions in a focused package for travel-related forms.
Explore Gravity Directions, try the distance and price-calculation demo, or compare all packages.